Excuse me while I blow the dust off of my keyboard, and swipe the cobwebs from my monitor. ..ehem..
I've missed you all so much! All this new school year business had me busy for at least a month. Not to mention catching up on swaps, orders (so exciting!) ...basically summer in general. How was everyone's summer holiday? I'll miss the summer season, but I have to admit. I'm over the hot weather. All I want to do is feel the cool breeze of fall, watch the leaves turn, and start prepping for the holidays. I'm hoping it's going to be wonderful with lots of good times. Instead of the usual frantic rush we tend to go though every year.
Today I have a tutorial for you. There have been a few questions about the dimensions for my bear paw block, and how I put it together. It's a 12.5"x12.5" block, and instead of sending out individual directions, I thought a tutorial might be helpful. I understand there are plenty of tutorials out there, but for those of you who would like my direction, I've put it together for you. It's a fairly long tutorial, so be sure to read through this, and get ready for a little elbow grease before you begin. Ready?
MATERIALS NEEDED:
Printed Fabrics;
EIGHT 2 5/8" squares (or 16 for the scrappy version)
FOUR 4" squares
ONE 2" square for center
*for the scrappy look I'm doing here, you'll need a different fabric for each printed fabric square. You will have some HST's left over! Which can be used for your other blocks. Pretty great since they'll be ready to go ;D.
Background Fabrics;
EIGHT 2 5/8" squares (or 16 for the scrappy version)
FOUR 2 5 3/4" rectangles
FOUR 2 1/4" squares
INSTRUCTIONS:
First you will need to construct a series of Half Square Triangle Units (HST), then construct the paw blocks, and finally combine these for one complete 12.5" c 12.5" SQ Bear Paw Block.
Let's begin with the HST blocks. It's pretty basic, and there are tons of blogs, you tube videos, etc featuring how to make them. This is just how I go about it.
HST Units:
1. Grab one 2 5/8" printed fabric square. Flip it wrong side up. Using an acrylic ruler and a fabric pen/pencil, draw a diagonal line across the center from the top corner to the opposite bottom corner of your fabric square
2. Place one marked 2 5/8" square print fabric, and one 2 5/8" back ground fabric, right sides together (RST).
3. Making sure your pieces are perfectly aligned, sew a 1/4" seam on either side of your drawn center line
4. Cut the square in half down the drawn center line.
5. You should now have two triangles. Open the two pieces, flip over, and finger press the seams open. Be careful not to stretch your fabrics, as this could distort your squares.
6. Turn right side up, using an acrylic ruler, trim to 2 1/4" x 2 1/4" squares. Making sure your seam stays centered.
You now have 2 HST units. Yay!! Repeat for a second set!
*for a scrappy look, you'll need to make 3 additional HST units, making sure each printed square is a different fabric. Remember, you'll have left over HSTs.
Once you have your HST's ready, you will also need a 2 1/4" square background fabric square, and a 4" printed fabric square.
Bear Paw Units:
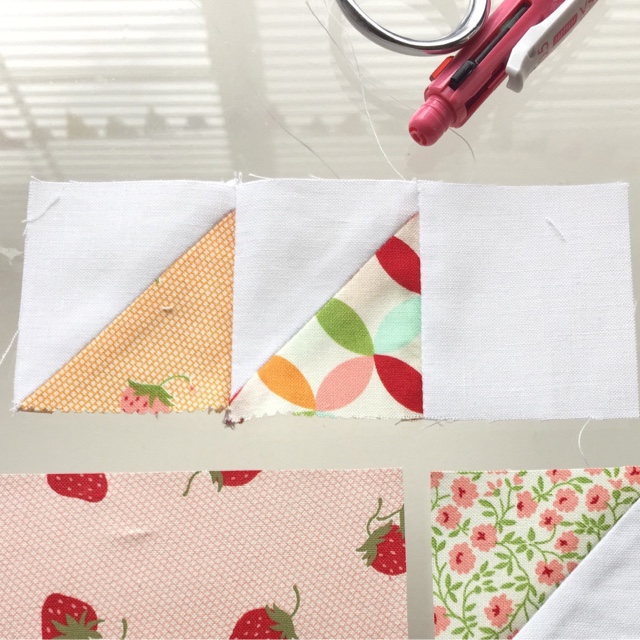
1. Grab two HSTs' and your 2 1/4" background fabric square. Make sure your HSTs are layed out with the printed fabric triangles at the bottom. Pointing down and to your Right. Your background square should be to your right of both HSTs
2. Using a 1/4" foot (be as precise as possible), sew these three squares together, side by side, in a row. Open your sections, and finger press the seams open. *You can use an iron, but be careful to Press and not Iron your squares. The ironing motion can distort your HST, as they're cut on the bias.
3. Take another pair of HST. This time, place them with the printed fabric at the bottom, but pointing to your Left. Sew together, open your sections and press seams open
4. Now take one 4" printed square piece, and your 2 HST strips, and lay them out with the 3 HST strip on the top, and the 2 HST strip on your right. Pay attention to the direction of your points!
5. Flip your double HST unit strip on top of your 4" square, RST, lining up the right side. Stitch together
Open and finger press your seam open.
6. Take your 3 piece HST strip above your newly pieces block, flip it over and on top of it. RST. Lining up your seams. Stitch.
Open your sections, flip over and finger press your seams open.
Viola! You now have a single bear paw block! Repeat for the remaining 3 bear paws.
You'll need a total of 4 bear paws for this block. Once these are ready, the assembly is pretty easy. Take a short break, grab a cup of tea or soda or cup of coffee, and we'll finish this right up! I'll be right here waiting for you....
...Ready? Let's get this baby finished!
After your paws are sewn together, layout your units and remaining pieces in a set of 3 rows like this.. (Apologies for the lack of contrast here!)
Be sure your paying attention to the direction of your paws this time.
1. Begin with the top row, left paw block, and sew this to the center rectangle background fabric piece. Then stitch that section to the last bear paw block on your right
Repeat for the remain two rows..
They should look like this..
2. Press the seams for the first and third rows outward towards the paws. Press the seams for the center row inward towards the center 2" block. Then sew these rows together. Top row to center row, making sure to nest your seams when you get to the centers. Then stitch your top unit to the bottom row. Again making sure you nest your center seams!
Press seams open, trim down to 12.5" x 12.5" if needed, aaaand..
TADAA!! You now have a 12.5"x12.5" Bear Paw Block!! Yay!
Whew, so much work for just one block. But it's soo worth it, don't you think? Be sure to tag me on IG (link to your left), if you use my tutorial to make your blocks. I'm always curious, as well as grateful to see your work grow with my help.
Happy Sewing!!
xo,
Veronica


 Congratulations Mae! I'll contact you for your free eBook copy!
 Congratulations Laura! I'll be in contact for your free eBook copy of Scrap Happy Sewing!!